Project Management with RStudio
HOME is where I want to be
But I guess I’m already there
I come home, a clean directory
I guess this must be the place

Learning objectives
- Understand motivation for code and data management
- Know how to organize code, data, and results
- Know the basics of file paths and directory structures
- Be able to create and use an RStudio project
Working Directory and File Paths
Any time you’re working in R, R needs to know where you are within your computer, which is referred to as the working directory. The working directory could be something like "YourUsername/Documents", or it could be something more specific like "YourUsername/Documents/GradSchool/Chapter1". Either way, R will think of everything in your computer as located relative to your working directory. One of the nicest parts of using R Projects is that they automatically set the working directory to the folder containing the .RProject file. You can see your current working directory by running the function getwd(), and you can set it using setwd(), but if you’re using an R Project, you generally shouldn’t mess with this too much.
All directories and files in R (and most computer languages) are located using file paths. The two working directory examples we just used are written as file paths, with / put between different levels. Within YourUsername there is a folder called Documents, and within that there is a folder called GradSchool, and so on. In R, file paths are always wrapped in quotes. There are 2 basic kinds of file paths: absolute and relative. Absolute paths list out the full file path, usually starting with your username, which you can also refer to using the shortcut ~. So instead of YourUsername/Documents, you can type ~/Documents. However, if you’ve got folders within folders within folders, typing out absolute paths can get really tedious. Relative paths are relative to your working directory. So if R thinks we’re in that Chapter1 folder, and we want to access a folder inside it called data, we can just type data instead of "YourUsername/Documents/GradSchool/Chapter1/data". What happens if we need to go up a level, into GradSchool? Well we can type .. to go up a level. So if we need to grab something from our Chapter2 folder, but our working directory is Chapter1, we would type ../Chapter2/FileWeWant.
Code & Data Organization
The scientific process is naturally incremental, and many projects start life as random notes, some code, then a manuscript, and eventually everything is a bit mixed together.
“Your greatest enemy is yourself four months ago” -Every grad student ever
A good project layout will ultimately make your life easier:
- It makes it easier to understand the pipeline from source data to final product
- It helps ensure the integrity of your data
- It makes it simpler to share your code with someone else
- It allows you to easily upload your code with your manuscript submission
- It makes it easier to pick the project back up after a break
Best practices for project organization
Although there is no “best” way to lay out a project, there are some general principles to adhere to that will make project management easier:
Treat raw data as read only
This is probably the most important goal of setting up a project. Raw data should never be edited, because you can never be sure that you will want to keep any edit you make, and you want to have a record of any changes you make to data. Therefore, treat your raw data as “read only”, perhaps even making a raw_data directory that is never modified. If you do some data cleaning or modification, save the modified file separate from the raw data, and ideally keep all the modifying actions in a script so that you can review and revise them as needed in the future.
Treat generated output as disposable
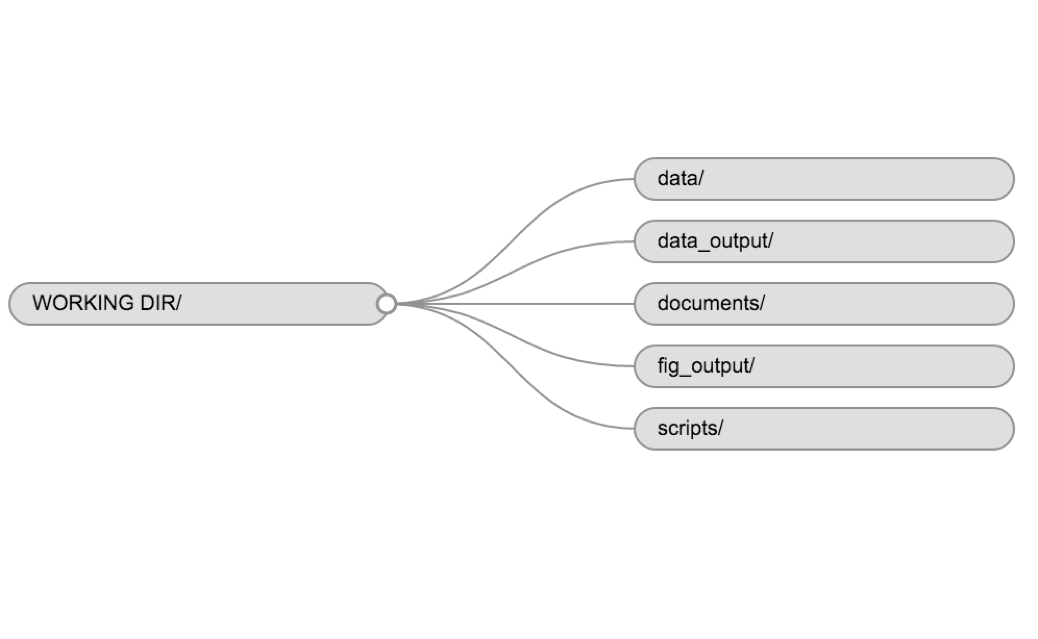
Anything generated by your scripts should be treated as disposable: it should all be able to be regenerated from your scripts. There are lots of different ways to manage this output, and what’s best may depend on the particular kind of project. At a minimum, it’s useful to have separate directories for each of the following:
- data: Ideally .csv files as these are flat, transparent, and universal. You may have other specialized formats as well. .rda and .rds are R-specific data files but you never need to use these.
- code: .R files, perhaps .do files if Stata is your thing, .py files for Python, etc.
- results: .png or .pdf files for plots; .tex or .txt files for tables
- papers: .tex if you write in LaTeX, .doc for Word, .Rmd for RMarkdown (which we recommend and will cover tomorrow afternoon), and .pdf or .html rendered documents.
RStudio Projects
RStudio has a feature to help keep everything organized in a self-contained, reproducible package, called a “project”.
A project is a small file with a .Rproj extension, but you can think of all the files and sub-directories as belonging to that project. We recommend creating a directory and a project file for each project you work on. It should look something like this:
When you want to work on this project using R, double click on the .Rproj file, and RStudio will open it and keep everything organized for you. You can also open an existing project from RStudio by clicking "File -> Open project…
Challenge – Create a Project
Let’s create a new project in RStudio. We won’t use this project today (we will ALWAYS work in the repository we pulled from github), but it’s good practice.
- Click the “File” menu button, then “New Project”.
- Click “New Directory”.
- Click “Empty Project”.
- Call your project “test_project_lastname”
- Store the new directory in the R_DAVIS_2020 folder you should have already created on your desktop.
- Click “Create Project”.
If everything went right, RStudio should’ve flickered and you should be looking at a pretty bare RStudio instance. That’s okay. Click on the “Files” tab in the lower right pane. Your .Rproj file should be there with nothing else. You’ve got the bare bones of a new project. Let’s now create the directory structure described above, a folder for each of data, code, results, and papers. You can do this in RStudio by clicking on the “New Folder” button in the Files pane, or in your OS by navigating to the directory you just created.
Challenge – Project Organization
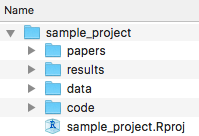
- In your project directory, either using the Project tab of RStudio or your OS’ file system, create the following directories:
- data
- code
- results
- papers
The finished product should look something like this on your computer:
Finally, let’s switch back to our R_DAVIS project that we will be working in for the rest of class. Go up to the right hand corner of your screen and click the pull down tab that currently says something like “test_project_lastname.” Once you click it, you can toggle between multiple projects at once by clicking the white square/arrow icon next to the project name. This will allow you to have multiple projects open at once. If you want to switch projects completely, just click the project name (not the white square/arrow icon).
Let’s do that now. Click on the project you’ve named R_DAVIS_2020. Once RStudio switches to the new project, the tab in the top right corner should read R_DAVIS_2020.
This lesson is adapted from the Software Carpentry: R for Reproducible Scientific Analysis Project management with RStudio materials and the Data Carpentry: R for data analysis and visualization of Ecological Data Before We Start materials. .